Filezilla How to Check for Changes and Upload
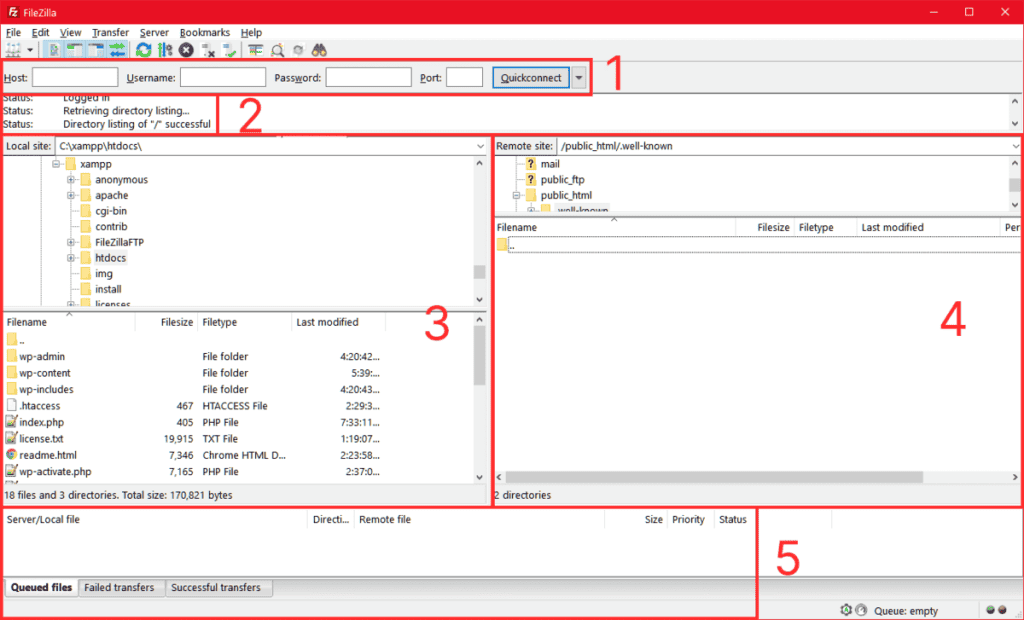
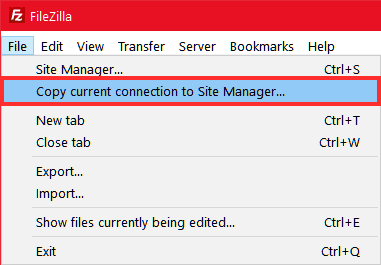
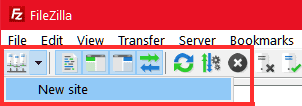
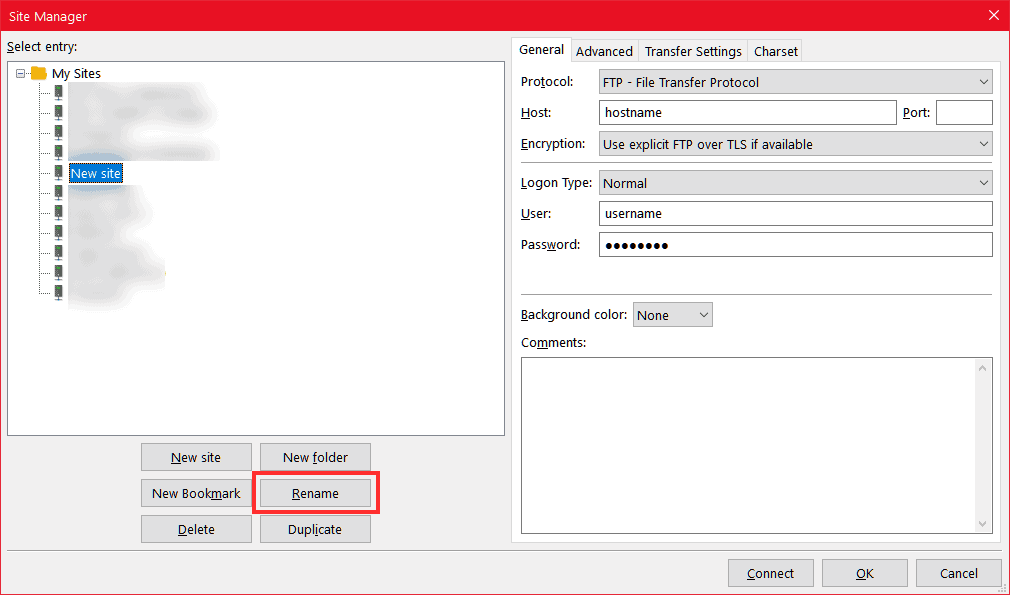
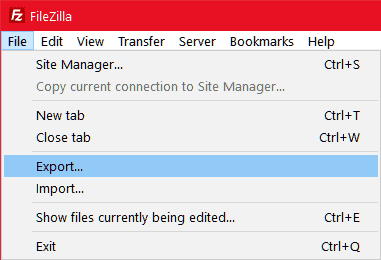
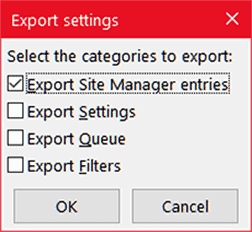
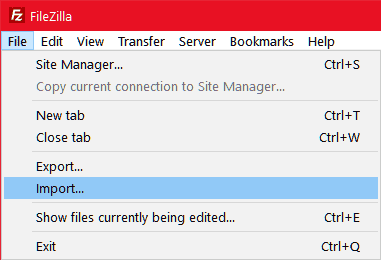
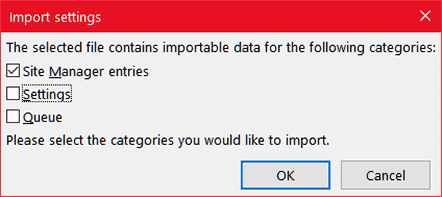
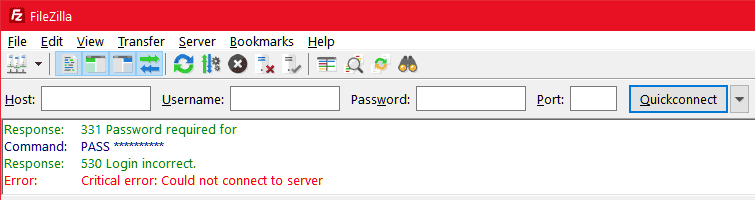
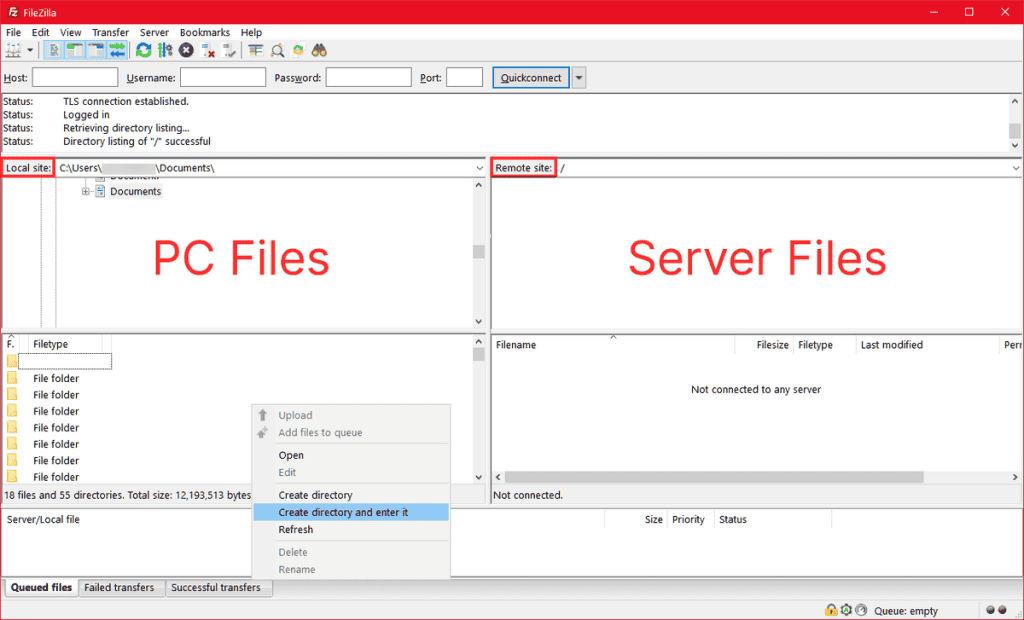
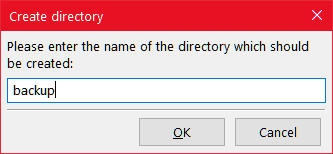
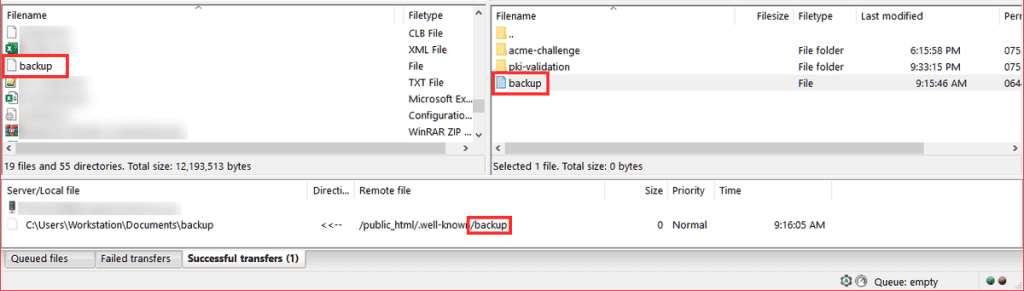
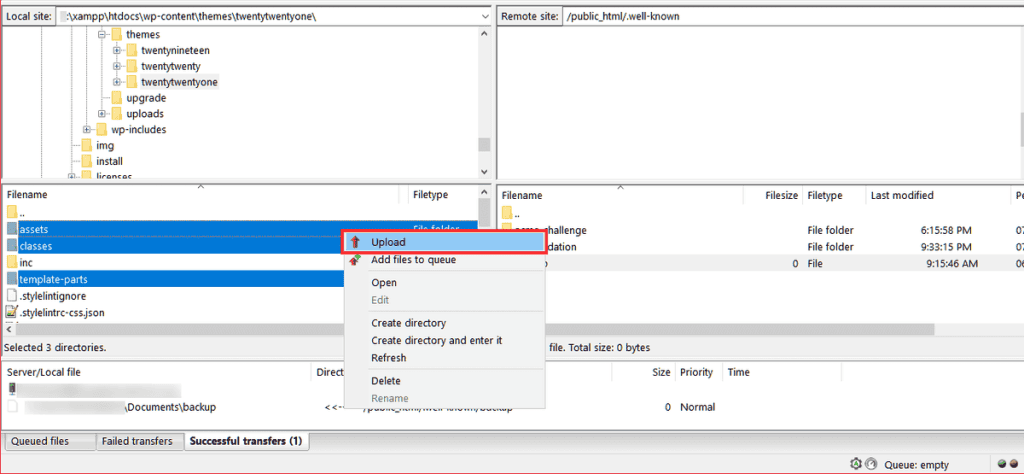
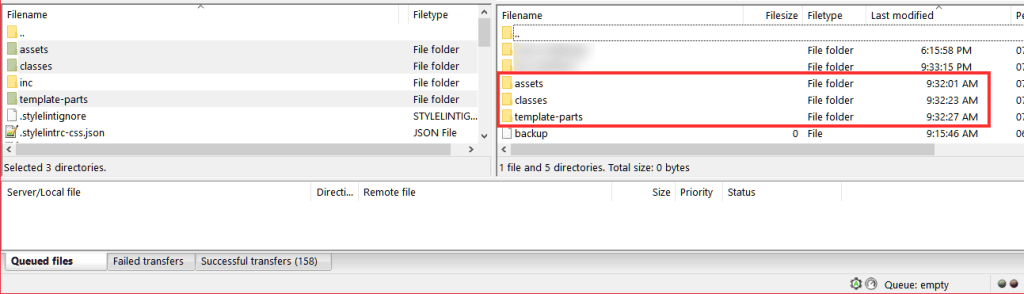
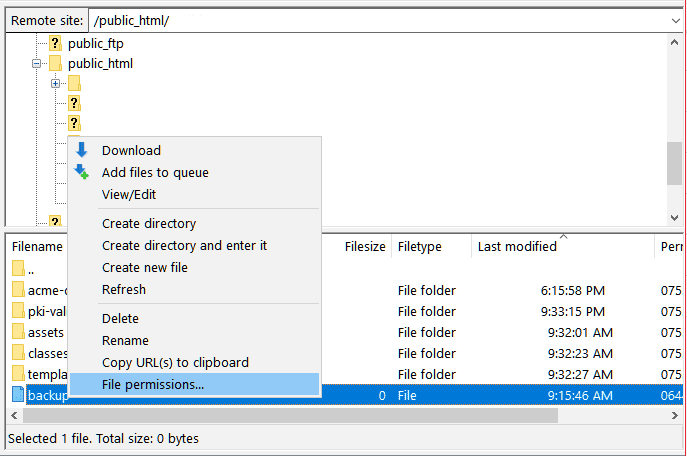
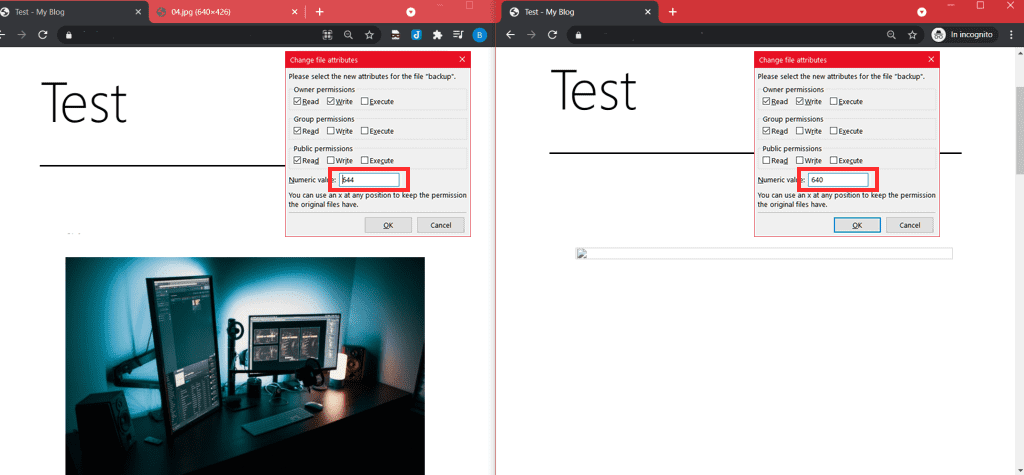
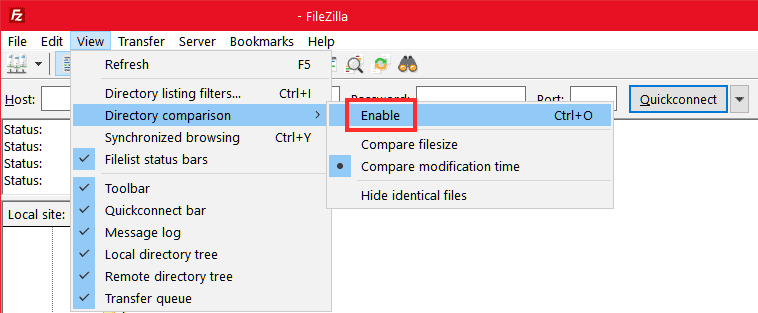
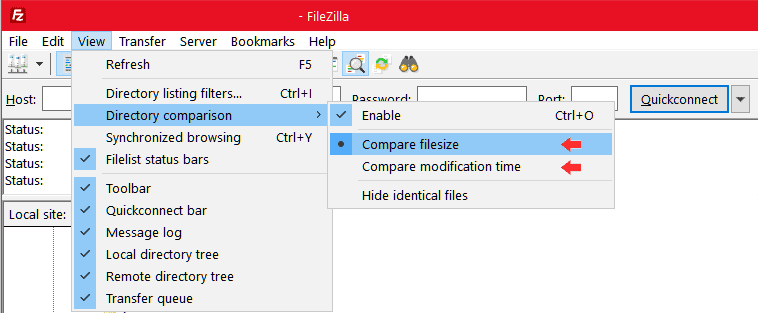
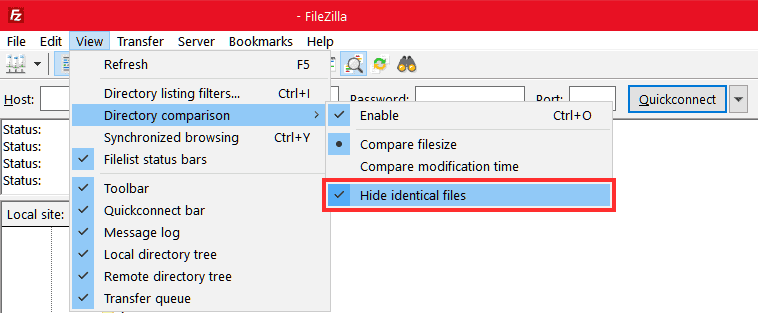
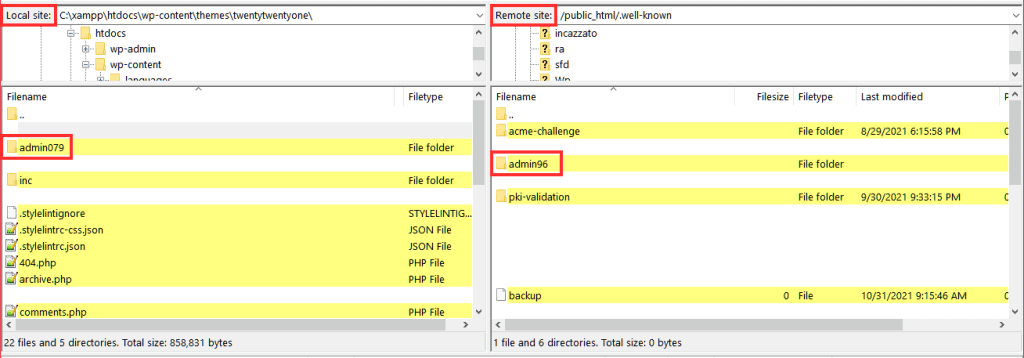
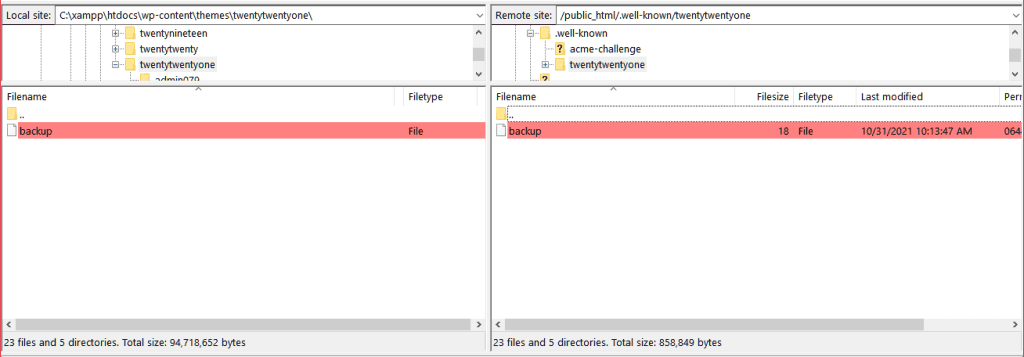
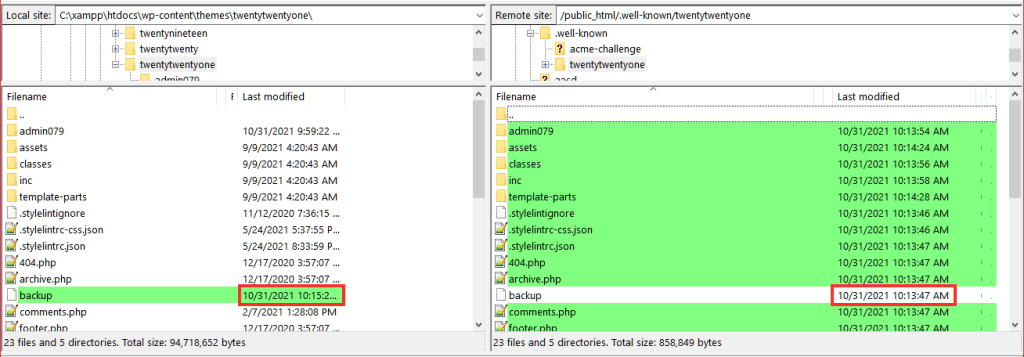
FileZilla is 1 of the most widely used FTP clients which enables users to connect to the server to access their site'southward files, edit them or transfer files to and from the server. In this guide, FileZilla: the definitive guide nosotros volition come across how to use FileZilla to access files and how to transfer information to or from your site. We'll then look at other features like how to use the site manager to store the connectedness to the server, but also how to compare the folders on your local motorcar with those on the server we're connected to. To go started, let's see how you download and install FileZilla and what its main interface looks like. Firstly you need to go to the project site and download the FileZilla client on your pc by choosing the version co-ordinate to your operating system. You tin download the latest version of FileZilla for Mac, Linux (Debian version or source code) or Windows (32 or 64bit). FileZilla is an FTP client that allows us to connect to a server and thereby be able to access the files on our site and edit them or upload files from the reckoner to the site. Using an FTP client to transfer files tin come up in handy on several occasions, for instance when we want to change the domain or migrate a WordPress site. Another instance when we demand to transfer files from our calculator to the server is if we need to install PrestaShop or WordPress manually. FileZilla is free and open up source and provides access to all the basic functions. The FileZilla Pro version also includes additional features such as file synchronization and allows you to restore transfers of files added to the queue afterwards interrupting them. Afterward completing the installation, open FileZilla and you'll be shown an interface like the one you encounter in the screenshot below: 1: The quick connection bar allows u.s. to connect immediately to the server by entering the host, username, password and port. 2: The message log: this area shows the information that indicates if the connection has been fabricated or how the transfer is proceeding. 3: The Local Site section shows us local folders and files, i.due east. those we have on our computer. For example, from here you tin can browse the folder that contains the files you want to upload to the server. 4: The Remote Site section is where you can encounter the folders and files on the server. At commencement, it will not show anything because we are not connected to the server yet. 5: The section at the bottom is the transfer queue, as you tin meet there are three tabs: Queued Files, Unfinished Transfers, and Completed Transfers. By clicking on each 1 you will exist able to see the listing of files to be transferred (queued), that has non been transferred ( incomplete) or that have been successfully moved or copied (completed). In order to employ FileZilla's FTP customer and transfer files from our PC to the server (or vice versa), we must kickoff connect to the server. Therefore, we need the data that is usually provided to you when you activate a program. If you accept activated a plan with SupportHost such equally WordPress hosting, VPS cloud hosting or a dedicated server, you will find the login details in the activation e-mail of your plan. Whereas if you've created a new FTP account you lot'll need to apply the username and countersign you entered during setup. There are two ways to connect to the server: use the quick connection or the site manager. Let'southward have a wait at them one at a fourth dimension. When yous open FileZilla y'all'll notice a Quick Connect bar that allows you to apace connect to the server. Host: enter the name of the server, usually it's the domain proper noun. In instance you have requested a transfer you can refer to the data provided by the provider and you will have to utilize the IP of the server that was provided during the installation. Username and password: enter the username and password provided by the provider. Port: in virtually cases, as in ours, the default port is used, i.e. 21. When the default port is used you tin can enter 21 or leave the field blank. If your provider has given you dissimilar indications yous must use the port that has been indicated. Later on filling in the fields click on Quick Connect to link to the server. If the connection is successful you will see in the Remote Site department the folders nowadays on the server. After connecting you lot can salve your admission data so that you don't have to enter them again to connect to the server. Merely click on File → Copy current connection to site management and click on OK. Yous can also connect to the server by directly using the site manager. Click on the Open Site Managing director push button as shown in this screenshot: You tin also open it using the key combination Ctrl + S. The site manager allows you to save your login information so you don't have to fill information technology in every time you connect to the server. Click on New Site and on the correct department of the screen you can enter the login details. Again we'll need to enter the host, username and countersign. The site manager likewise allows united states of america to choose the protocol to be used for file transfer. In add-on to FTP yous tin also utilise SFTP. For the type of admission in addition to the default option, that is Normal, you can choose: Crave countersign: the plan requires you to enter the password when you log in and information technology and so stores it during the current session. Interactive: if you want the program to enquire for the countersign at each new server connexion (even in the same session). Afterwards choosing the protocol and entering the admission data you tin can click on the Connect button to proceed. Past using the site manager to connect, when we go to open up FileZilla the adjacent few times, instead of entering the information nosotros'll simply click on the arrow next to the Open up Site Manager button and select New Site (or the name you entered when y'all saved the item) from the listing, equally follows: If we have set the admission type to Normal nosotros won't exist asked for data and the client volition connect direct to the server, if not, nosotros may need to re-enter the password to connect. The site manager allows us to store login information to connect to multiple sites. If you manage more than one site, it is worth renaming each one so that you recognize them immediately instead of leaving the default name used past the plan "New Site". To practise so, just click on Open up Site Direction, select the connection we are interested in and click on Rename. Practice you need to utilize FileZilla from several different computers? FileZilla allows you to consign the settings and connectedness data stored in the site management in order to import them to some other computer. To do this, all you have to do is access FileZilla from the master figurer and click on File → Export. Let's therefore choose, what nosotros want to consign, for example, the items added to the site manager, click Ok and save the xml file. At this signal, we will take to transfer the file to the other estimator, open FileZilla and click on File → Import. Allow's select the xml file we transferred from the other computer and click on open. A dialog box volition tell us what will be imported and allow us to cull whether to import all the information or just some. If you are unable to connect to the server then check the mistake log. An error like the one yous see in the screenshot below is due to an error while typing your username or password. Brand sure you have typed correctly, for case by copying and pasting the password you may have entered some spaces, in this example, it is better to enter the data past paw and try once more. Now that we have seen how to connect to the server and we have established a connexion nosotros now accept access to the files and we can transfer folders and files from the server to our computer or vice versa. Allow's see how to do information technology with some examples. In this example, I'll show yous how to download from the server a fill-in created with cPanel. Earlier downloading the file permit's interact with the left section, that is Local Site and open the folder where we want to transfer the file. If nosotros want to create a new folder nosotros but right click and click on Create Folder and enter it to create and open up the folder. Then enter the name to requite to the folder (in the case of this example "backup") and click OK. Permit's locate the file on the server (using the correct section Remote Site), which in our case was on the homepage. By double-clicking on the file we desire to transfer, the file will be copied directly into the local folder we take just created. You can follow the transfer process and meet how much fourth dimension is left by looking at the queue. When the transfer is consummate the file that was previously in the Queued Files tab will be visible in the Completed Transfers tab as seen here: In the same way, equally nosotros have seen with downloading files, nosotros can upload files from the PC to the server. In this case, we just need to notice the files to upload and drag them to the destination folder on the server. Nosotros can transfer more than one file at the same time, all we need to practice is select them by holding Ctrl while clicking on the ones we are interested in. Then elevate the files from the left panel (Local Site) to the right panel (Remote Site). Alternatively, we can also right-click and click Upload to start the file transfer. Equally soon every bit the file transfer is completed we will meet them in the destination folder on the server. FileZilla also allows us to alter file and folder permissions. Before moving frontwards with changing file permissions recall that the wrong setting can compromise the apply of the site. Generally, WordPress and other CMS files should take permissions 644 and folders 755, this also applies to the upload folders of the site. Locate the file or binder y'all are interested in and right-click on it. On the menu, click on File Permissions. The tab that will open allows usa to change the permissions to read, write and execute. Note that possessor permissions refer to the user who owns the file, while public permissions employ to everyone. In this case, past irresolute the read permissions of an image, hither are the results nosotros have on the site: To the left, we accept the folio equally it appears with the permissions set up to 644, and to the right, we have what would happen if we removed the public read permissions of the image. FileZilla as well gives us the ability to compare the contents of the folders locally with those on the server. This feature is useful if we are developing the site locally and nosotros want to compare the files to those on the server, or if nosotros want to continue a backup of the site locally. To activate it click on View → Compare folders → Enable. We tin choose whether to compare files by size or by modification date, selecting one of the two options from the Folder Comparing carte, like this: We also take the pick to hide identical files, so when nosotros compare two folders we will only meet files that differ by size or modification appointment. Nosotros can activate this option from the card View → Folder comparison, as you tin see hither: After enabling folder comparison nosotros volition come across files and folders highlighted in different colors. Let'southward see what the unlike colors mean. Non-highlighted items: non-highlighted folders and files represent identical files and folders. This means that at that place is no departure betwixt these items on your computer and the respective items uploaded to the server. Highlighted items in xanthous: they correspond folders or files present only on your computer or only on the server, depending on which department they are in. In this case, the folder admin079 is on the pc, while the folder admin96 is on the server. Highlighted items in red: files or folders in scarlet on both sides represent files of unlike sizes. In this example nosotros accept the fill-in file on the pc and on the server, but every bit y'all tin can see the sizes of the two files are dissimilar. Highlighted items in green: if nosotros activate the comparison by modification date we will encounter some files and folders in green. In this example, we have the .htaccess file in light-green on the pc, while the server version is not highlighted. The file highlighted in greenish is the most recent one, so in this case, the nearly contempo version is the i on the pc. If we cheque the cavalcade of the concluding modification, nosotros have confirmation. In this article, FileZilla: the definitive guide we have seen how to utilize the FileZilla FTP client to connect to the server on the network and access files. Everything we need is in the master window. In one case we are connected to the server, we tin access the files and transfer them from the local PC to the remote site or vice versa, by only dragging them from one location to another. To height it off we looked at a very useful feature that lets us compare folders by highlighting the differences between the files on the local machine and those on the server. What about y'all, have y'all used FileZilla to admission files hosted on the server before? Allow me know in the comments beneath when you plant it useful to do so. How to install FileZilla
Filezilla:the definitive guide: how it works
Connecting to the server with FileZilla
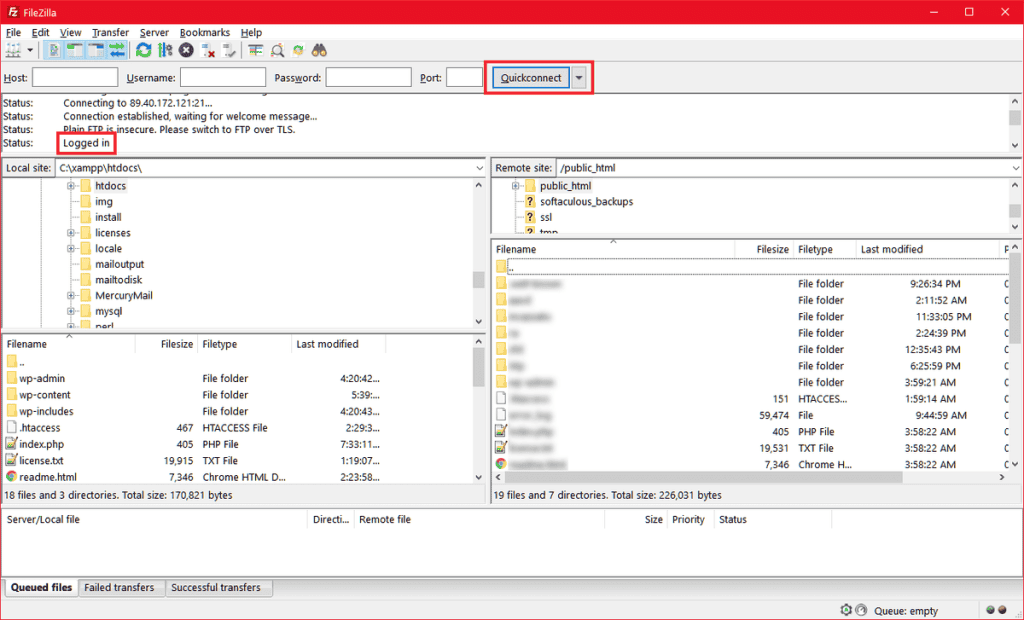
Quick connection

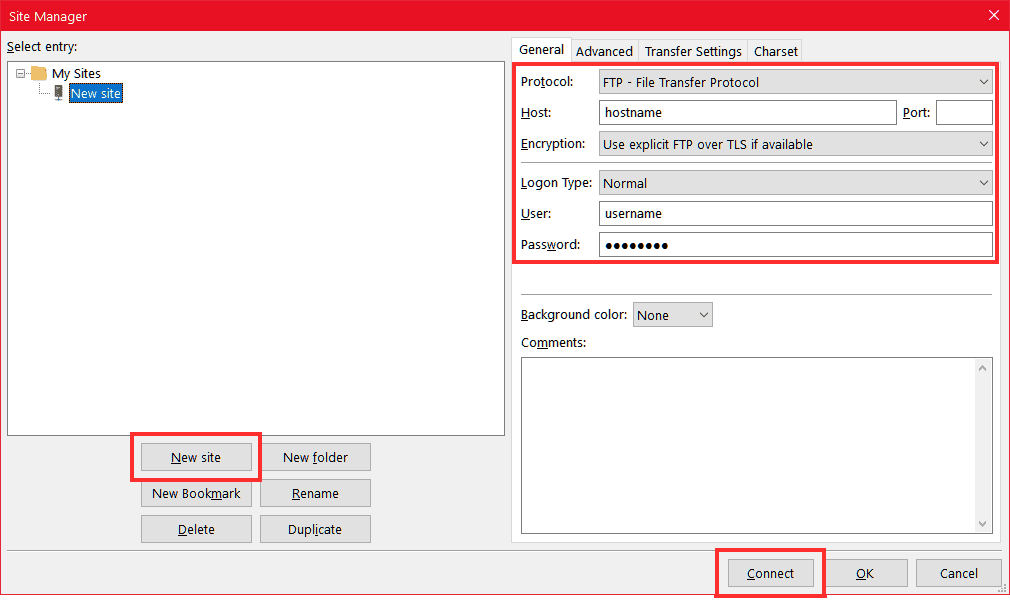
Connecting with the site manager

Connection errors
Transferring Files
Download files from a server to pc
Upload files from pc to server
Change file permissions with FileZilla

Compare folders
Decision
Source: https://supporthost.com/filezilla/
0 Response to "Filezilla How to Check for Changes and Upload"
Post a Comment